

If you don't know how to resolve the copilot error, read the authentication guide and there is a guide you can use with it.
An issue that some of the users face is when trying to build a project. This has happened a few times after the Cypress installation for testing with NPM or generally with Copilot. This error may happen due to several reasons. In rare cases, it is just a network problem; in more frequent cases, it is because the framework and browser are incompatible. Everything you need to know to fix the Auth issue is here in this page. Be sure to read the ECONNRESET Copilot Error.
The meaning of Read ECONNRESET is unclear
The most common reasons for the Read ECONNRESET error in GitHub Copilot are incorrect proxy settings, firewall, or antivirus blocking, network instability, and other network-related issues. It means that the TCP connection was abruptly terminated, which could cause communication issues since it shows that the remote host forcibly closed the connection. You can help yourself with these methods given in this post.
Resolve Author See ECONNRESET Copilot Error
The following are a few of the possible solutions to the Auth Read ECONNRESET Copilot error that you are likely to encounter.
Structural changes
Change to a different network
Close any VPN or proxy services.
Create your own token
Add Copilot API along with an exception
Visual Studio Code and the Extension of Copilot to be reinstalled
We shall discuss them in detail.
1. modify the code
This may be a problem with your browser having been upgraded lately and is therefore incompatible with the earlier version of the framework you are using. The solution to this problem will involve updating the framework and, if at all possible, the language.
Since the Auth Read ECONNRESET problem seriously whammied the Cypress framework, we can find all instructions of migration at docs.cypress.io. If you work with Node.js, too, don't forget to update that version as well.
However, in case you started seeing this error right after you updated the above framework, upgrade the browser itself.
2. Switch to an alternate network
The following is a detailed overview of how one could diagnose the root of such an issue from the standpoint of possible network errors. Firstly, if it's at all possible, please switch over to another network. If that can be done easily enough, create your hotspot and then access the connection from it. Alternatively, if available, connect using your friend's Wi-Fi. Just make sure this clears the problem.
3. Try disabling all VPN or Proxy Services.
The framework may not be able to detect the server you are trying to connect to if you are using a VPN or proxy. Then you need to disable the VPN or proxy. Your device is probably automatically connecting to a proxy or VPN even if you haven't done it yourself; therefore, we need to disable it. If you want to accomplish it, just follow these steps.
Go to the Settings menu by pressing the Windows key plus the icon.
To access the proxy settings, navigate to the Network and Internet menu.
Subsequently, turn off the switch for Automatically detect proxy.
Last but not least, turn off your computer.
As soon as your computer starts up, see if the problem has been fixed.
4. Make a brand-new identification token
First of all, make sure the credentials you use for authentication are updated and include the proper rights. Furthermore, it would be highly advisable to create a new token for the request that has failed. If you want to do that, just follow the steps below.
First, you should open your Github account via github.com.
Click on your profile icon and choose the Settings menu from there.
Now you should go to Developer Settings.
Click on Personal access tokens, then click Token (classic).
Go to the Generate new token menu and click Generate new token (classic). You can also go ahead and click Generate new token (Fine-grained, repo-scoped) for a more fine-tuned scope.
Click Generate token after filling in the details and selecting the scopes.
Try using this new token to see if the issue is resolved.
5. Whitelist the Copilot API.
To make it easy to integrate Copilot into the program and to help developers in writing efficient code, Microsoft provides the Copilot API. A potential problem is that the Windows security program may mistake the API's attempt to integrate and block the integration, thinking it's a virus. We can disable this by adding an exception to the Windows Defender Firewall for the Copilot API. Here are the steps you should take to do so.
Open the Control Panel by using the Start menu to search for it.
In the View by menu, select Large Icons.
Find and click Windows Defender Firewall.
Now, tap on Turn Windows Defender Firewall on or off.
Tap Allow an app or feature through Windows Defender Firewall.
In order to allow another app, tap Change settings, then tap Browse.
Locate the API files on your computer. Select them and then tap the Open button.
Now, exit the Control Panel after adding the API.
We hope these steps will help you resolve the copilot's error by reading the authentication; it will always work a lot.
I will tell you How to create Copilot agents using Microsoft AI?
Today I will explain to you how to create AI co-agents or Copilot-powered applications.

Here you already have a complete guide that you will learn How to enable or disable the Recommended section in Explorer Home in Windows 11.

If you are wondering how to set VirtualBox you cannot connect to the Internet? Here you already have a guide with my best response.

If you don't know how to set up the initial applications, you don't need to go to the Windows 11 Configuration application, you have a complete article that you need with it.

If you don't know how to fix the problem of the mouse cursor not blocking in the game on Windows 11, here we leave you a guide that will help you with it.

To learn how to fix Windows Update error 0xc1900131, here is a complete guide that will help you.

Today in our article we teach you how to Show the Edge Bar on the Windows 11 Desktop.

Here you have a complete guide so you can learn how to repair the Office error code 0-1012.
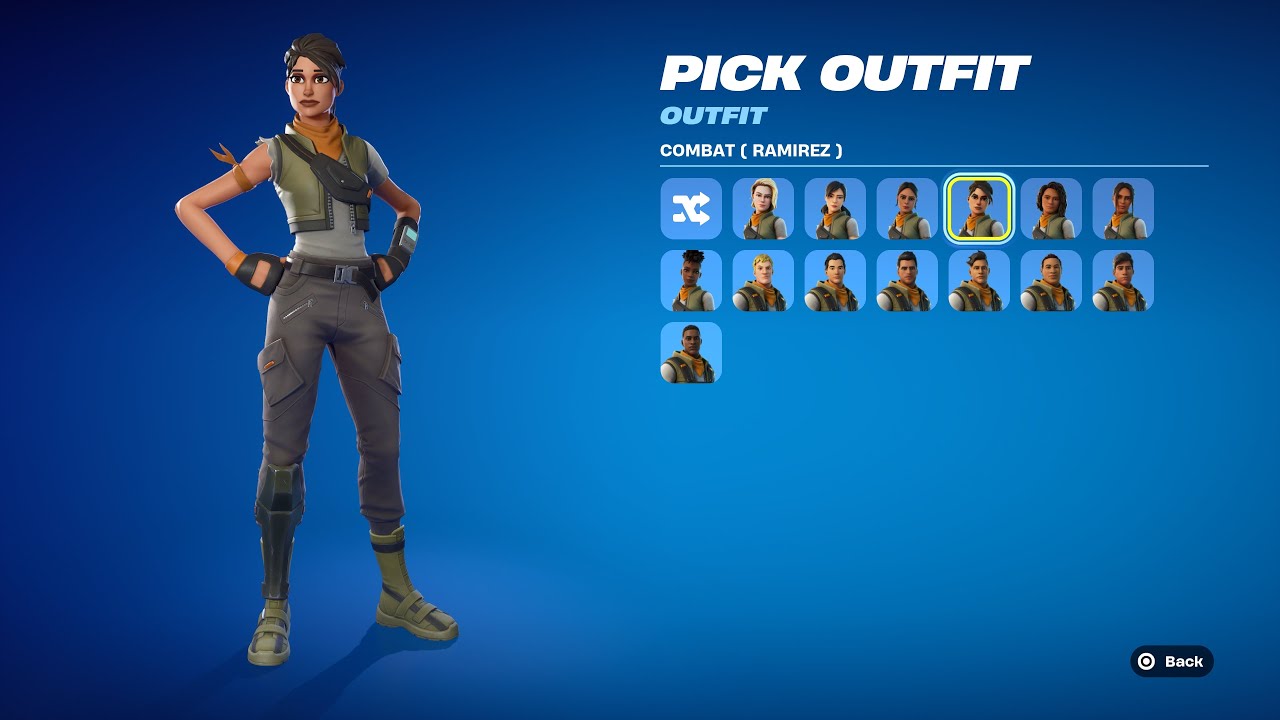
If you're wondering how to change your predetermined mask in Fortnite? Here you already have a guide with the best service.