


Discover the identity of the captivating singer featured in the YouTube Music ad. Uncover the artist behind the music and their latest hits.
Watch YouTube video
Release Date: 2026-01-20

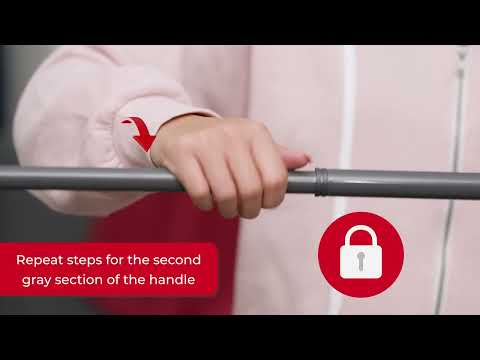
This instructional clip demonstrates the handle assembly process for the EasyWring Spin Mop. Key points shown include:
Connecting the mop handle sections — the telescoping handle usually comes in two or more pieces that screw together. (Manuals+)
Extending and locking the telescopic pole to a comfortable working length (usually up to about 48 inches / ~122 cm). (O-Cedar)
Attaching the assembled handle onto the mop head and base so it’s secure for mopping. (Flavor365)
The video helps ensure that the handle is properly tightened and aligned before first use so the mop works smoothly with the bucket’s spin wringing action.
The main goal of this video is to show how to quickly assemble the EasyWring mop handle so you can start mopping effectively. It focuses on providing clear, visual steps to:
Guarantee the handle is sturdy and doesn’t collapse during use
Make sure the user doesn’t struggle with fitting parts together
Reduce setup confusion, especially for first-time owners
This instructional content ensures that viewers get the most out of their mop by starting with correct assembly — a key first step to comfortable and efficient floor cleaning.
| Element | Detail |
|---|---|
| Video Title | How to Assemble O-Cedar EasyWring Spin Mop Handle |
| Author / Channel | O-Cedar / Official or product support |
| Publication Date | Likely recent based on product model year |
| Duration | ~1–2 minutes (typical assembly guide) |
| Category | Home & Cleaning / Product Instruction |
| SEO Keywords | O-Cedar EasyWring Spin Mop assembly, how to assemble mop handle, O-Cedar mop setup, EasyWring Spin Mop instructions |
Clear step-by-step visuals: See exactly how the handle parts connect.
Avoid assembly mistakes: Reduces frustration with mismatched or loose parts.
Mop readiness: Helps you get your EasyWring system ready to clean floors faster.
Helpful for first-time users: Great if you just bought this model or haven’t used a spin mop before.
O-Cedar EasyWring Spin Mop guide
EasyWring handle assembly video
how to set up O-Cedar mop
mop handle telescopic setup
EasyWring Spin Mop instructions
The O-Cedar EasyWring Spin Mop handle assembly video is a concise and practical guide for getting your mop ready for action. By showing how to connect, extend, and secure the handle parts properly, this video ensures you start your cleaning with confidence and without unnecessary confusion.
Discover the identity of the captivating singer featured in the YouTube Music ad. Uncover the artist behind the music and their latest hits.
Discover the song featured in the Apple Music 2026 commercial. Uncover the artist and track details that are captivating listeners worldwide.
Discover the artist behind the captivating Spotify Wrapped campaign ad. Uncover their music journey and impact on the streaming world today.
Discover the catchy tune featured in the Spotify Premium 2026 commercial. Uncover the song's title and artist, and explore its impact on the ad's vibe.
Discover the captivating song featured in the Bose immersive sound ad. Uncover the artist and track details that enhance your listening experience.
Discover the artist behind the captivating Beats campaign commercial. Uncover the story and inspiration that brought this powerful ad to life.
Discover the stars of the latest Marshall speaker commercial and learn about their roles and impact on the brand's iconic image. Click to find out more!
Discover the catchy background song featured in the JBL portable speaker commercial. Uncover the artist and track details that make it unforgettable.
Discover the artist behind the captivating song in the Apple AirPods Pro ad. Uncover the details and enhance your listening experience today.