

Are you having trouble with iTunes or your iPhone? Learn how to fix iTunes error 9006 or iPhone error 9006 with our step-by-step guide.
iTunes is an essential application for iOS device users. It allows you to manage your music, videos, photos, and other media files on your iPhone, iPad, or iPod touch. However, sometimes when you try to update or restore your iOS device, you may encounter an error code 9006. This error code indicates that there is a problem with your internet connection, security software, or iTunes itself. In this blog post, we will explain how to fix iTunes error 9006 or iPhone error 9006.
Part 1: What is iTunes Error 9006?
iTunes error 9006 is a common error that can occur when you try to update or restore your iOS device. This error usually occurs due to a problem with your internet connection, security software, or iTunes itself. When you encounter this error, your iOS device may become unresponsive, and you may not be able to update or restore it.
Part 2: Update iTunes and macOS/Windows
The first step in fixing iTunes error 9006 is to update your iTunes and operating system. It's important to keep your software up to date because updates often include bug fixes and other improvements that can help prevent errors like error 9006. Here are the steps to update iTunes and your operating system:
- To update iTunes on a Mac, open the App Store and click on the Updates tab. If there is an update available for iTunes, click on the Update button to install it.
- To update iTunes on a Windows PC, open iTunes and click on Help > Check for Updates. If there is an update available for iTunes, follow the on-screen instructions to install it.
- To update macOS, click on the Apple menu > System Preferences > Software Update. If there is an update available for macOS, click on the Update button to install it.
- To update Windows, click on the Start menu > Settings > Update & Security > Windows Update. If there is an update available for Windows, click on the Update button to install it.
Part 3: Disable Antivirus and Firewall
Antivirus and firewall software can sometimes interfere with iTunes, causing error 9006. To troubleshoot this error, you can temporarily disable your antivirus and firewall software. Here are the steps to do so:
- To disable antivirus software on a Mac, open the Antivirus software and look for an option to disable it temporarily. If you can't find this option, you may need to uninstall the software temporarily.
- To disable antivirus software on a Windows PC, open the Antivirus software and look for an option to disable it temporarily. If you can't find this option, you may need to uninstall the software temporarily.
- To disable firewall on a Mac, click on the Apple menu > System Preferences > Security & Privacy > Firewall. Click on the Turn Off Firewall button.
- To disable firewall on a Windows PC, click on the Start menu > Settings > Update & Security > Windows Security > Firewall & network protection. Click on the active network profile and toggle off the Windows Defender Firewall switch.
Part 4: Use iTunes Alternative
If you are still encountering iTunes error 9006, you may want to consider using an iTunes alternative to manage your iOS device. An iTunes alternative can help you avoid this error and provide additional features that iTunes doesn't offer. Here are some recommended iTunes alternatives:
- iMazing: iMazing is a popular iTunes alternative that allows you to transfer music, photos, videos, and other media files between your iOS device and your computer. It also allows you to backup and restore your iOS device without using iTunes.
- AnyTrans: AnyTrans is a comprehensive iOS device manager that allows you to transfer, manage, and backup your iPhone, iPad, or iPod touch data. It supports a wide range of file types, including music, videos, photos, contacts, messages, and more.
- Tenorshare iCareFone: Tenorshare iCareFone is another iTunes alternative that allows you to manage your iOS device without using iTunes. It allows you to transfer files, manage contacts, backup and restore data, and more.
Part 5: Use Recovery Mode
If you have tried all the above methods and are still encountering iTunes error 9006, you may need to use recovery mode to fix the error. Recovery mode is a special mode that allows you to restore your iOS device to its original state by erasing all data on it. Here are the steps to enter and exit recovery mode:
- Connect your iOS device to your computer and open iTunes.
- Press and hold the Home and Power buttons on your iOS device simultaneously for about 10 seconds.
- Release the Power button but continue holding the Home button until you see the Connect to iTunes screen on your iOS device.
- In iTunes, you should see a message saying that your iOS device is in recovery mode. Follow the on-screen instructions to restore your iOS device.
iTunes error 9006 can be frustrating, but it's usually easy to fix. By updating iTunes and your operating system.
Lear How to Fix Location Services Not Working on iPhone, in this guide
To learn how to record calls on an iPhone, here is a complete guide.
I will teach you how to fix the problem of the iPhone constantly disconnecting from Wi-Fi

Learn How To Fix “Can’t Log Into Steam” Error In Windows 10?

If you're having trouble with your wireless printer, don't worry! Our guide on how to fix wireless printer not responding on Windows 11 covers all the possible causes and solutions to help you fix the issue.

Learn how to unzip and extract files on Mac. This step-by-step guide will help you understand what ZIP files are, the benefits of using them, and how to extract files from them.

learn How To Fix Brightness Function Key Not Working In Windows 11

Don't worry if you can't find the App Store on your iPhone. Our guide on "How To Fix App Store Missing On iPhone" offers two easy solutions.
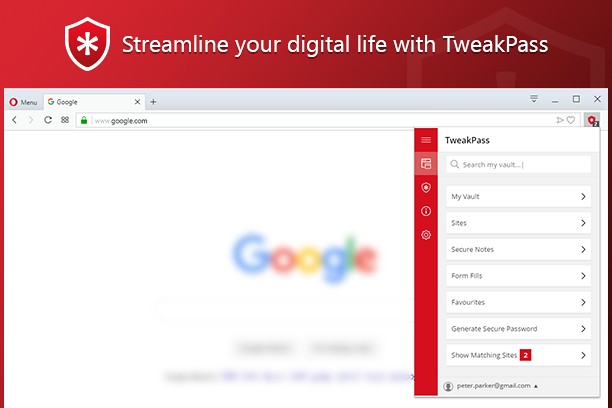
Learn how to enable the Tweakpass Web browser extension with our step-by-step guide. Our article provides clear instructions and screenshots to make the process easy. Keep your online accounts safe and secure by mastering Tweakpass Web browser extension today!
learn How To Fix Downloads Folder Not Responding on Windows 11

Want to learn how to add extensions to Safari? Our step-by-step guide will show you how! Discover how to access the Safari Extension Gallery and the different types of extensions available. Enhance your browsing experience today!